Here are tips you can count on! Denise Wilson has been a Seed Collection Project Manager for the National Park Service in eight western National Parks, including here in Colorado at the Black Canyon of the Gunnison and the Sand Creek Massacre National Historic Site parks. As the Western Seed Collector for the Chicago Botanic Gardens for 12 years, her collections have been included in the seed banks of the Millennium Seeds of Success and the Dixon National Tall Grass Prairie Seed Banks. Denise has been a practicing gardener on her own property in Coal Creek Canyon for many years. Follow her directions and propagate the natives you love!

Do take photos of plants you want to collect from
so you will know where they are after the flowers have gone.
Clockwise: Delphinium nutallianum, Gaillardia aristata,
Pulsatilla patens, Ipomopsis aggregata, Helianthus spp.
Photos by Denise Wilson
Why should you grow native plants anyway? Because you will:
- Be more successful
- Use less water, and water less often
- Attract birds, butterflies, and other pollinators
- Help provide a native corridor area.
We’ve got about a million species of insects, which represent 40% of our living organisms on earth. And you can do something because you have a micro habitat to plant, no matter how small. So how are you going to do that?
How to record plant locations for seed collection
You must find a way to know exactly where to collect the seeds you want, as the flowers will be gone when the seeds are ready to harvest. We’re talking about five to six weeks after flowering. They may have lost some or all of their leaves, and have likely turned brown. One good way is to use your phone and download the GPS information of where the picture was taken. Or you can use an app such as Gaia, Solocator, iNaturalist, or Avenza to document the location. If the plant is on your own land, or if you have permission from another owner, you can use flags or flagging tape. You can map out your own reference map. But you’re going to need to some way let yourself know where to come back and find those pretty flowers when they don’t look like that anymore!
.

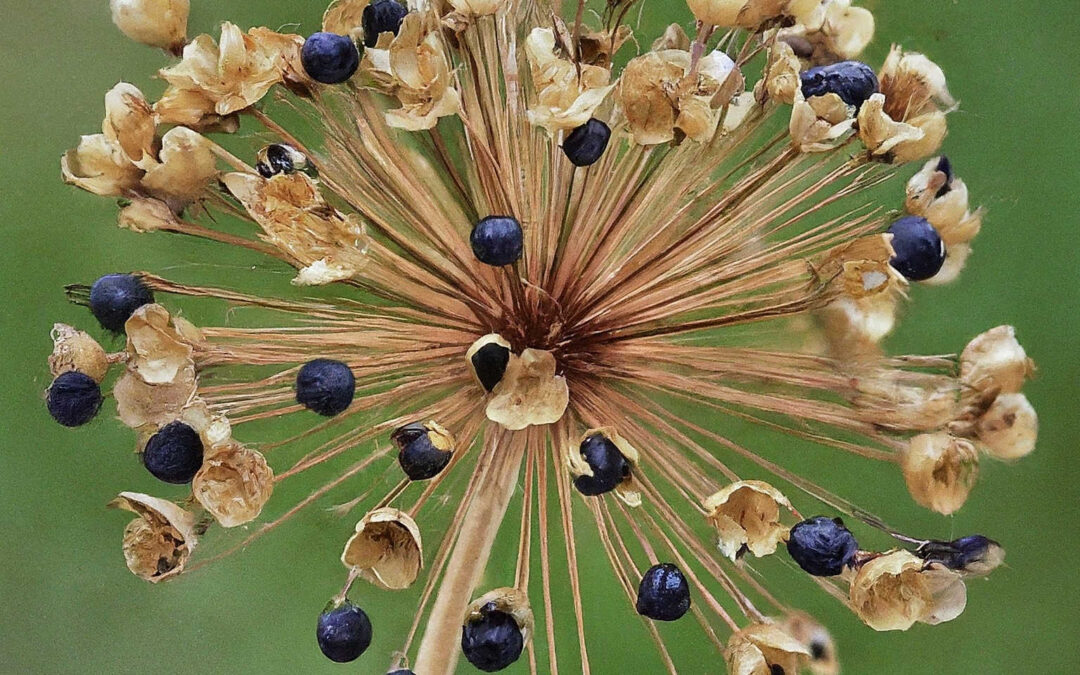
Geyer’s onion, Allium geyeri – it won’t look like this
when the seeds are ready! Plan to record the
location of plants you want seeds from. Photo: SPD

Seeds of this Geyer’s onion are tiny, black, and very
hard – easy to tell they are ready. Image created
by SPD/Gemini
Collecting for genetic diversity
Genetic diversity is all of the traits of the particular species that you are interested in, including color, drought resistance, early and late-season seeding capacity, and all kinds of other traits. So what you want to do is to collect from as much of the population as you can, but just a little bit, right? Collect from many different locations out in the field, and get all of the traits that you can possibly capture because that’s going to cover a wide range of conditions in your environment.
And here’s the rule. This is a hard-fast rule for sustainability. You don’t collect more than 20% of the plants’ population. You don’t collect rare plants at all. That’s it. So if you’re out looking and you can see ten plants and they each have six buds on them, now you’ve got ten times six, you’ve got 60, 60 times 20%. You can collect 12 of those individual capsules from different plants around. So that’s the way to think about it. You won’t be harming any native population and you’re going to be maximizing your genetic diversity by collecting throughout the population.
Timing, tools, and the cut test for seed collection
Once you have marked your specimens, you will want to go back somewhere in the neighborhood of four to six, and usually closer to six, weeks afterward, when they have gone to seed. The most common mistake is collecting seeds before they are ready. However, there isn’t any point in collecting if you have insects in the seed capsules. To check you will need a small sharp tool. I like to use a mini swiss army knife with tiny scissors for this job. Cut into the seed capsule at an angle and make sure that there are no insects inside.
Another useful tool is a hand lens with an LED light and a magnification of 40. And if you’re a science nerd, or a nature nerd, or if you have grandkids, for 40 bucks go online and get yourself a USB plugin microscope!
Once you know your seeds are insect free, check for readiness by cutting a seed in a crosswise section – you want to see white. That’s mom plant packing a lunch for baby. That’s the endosperm, that’s the starch that is needed to produce the first leaves – the moncotyledon or dicotyledon – because the new plant can’t photosynthesize until it has chlorophyll and leaves. You want it to be firm inside, not wet, or green.

Look for a firm, white endosperm, it contains the starch the seed needs
to produce its first leaves. It should not be wet or green inside.
Image created by SPD/Gemini
What if your seeds are not quite ready to harvest?
Maybe the plant has some seed capsules that are still green, but some of them are brown and look mature. In that case you can cut off the entire top, mature and immature together, and then lay it out on newspaper and let it dry, keeping it in a space under 80 degrees and with low humidity. Sometimes the endosperm will appear white and not liquid, but not yet as firm as you would like, this is called the soft dough stage. In this situation, follow the same procedure as above. Never store these seeds in plastic, use paper as they must have air to breathe.
Post collection seed care
Let your seeds dry out for a couple of weeks. Spread them out in flats lined with newspaper. Keep them in a cool, dry place – do not let them freeze or overheat, and maintain good ventilation. Watch out for mice. Ideally, you want maybe 15% moisture. That may be hard to test for, but it’s our relative humidity here in Colorado. The seeds can now be kept until spring, stored in a refrigerator in paper, or sown outside to overwinter.
Fruits (Boulder raspberry, Rubus deliciosus, for instance) are somewhat different because they have flesh on them. Those you will need to wash in the sink in a sieve to clean them and remove some of the fleshy material. And then you want to keep them cool and wet. Here is the one exception to no plastic, because you will need to store these seeds in the refrigerator in a plastic bag inside a rigid container, unless you plant them right away.
Breaking dormancy and sowing the seeds
Many of our perennials could be sown right on top of the snow, either where you want to grow them or in pots kept outside. Winter will provide the right conditions to break their dormancy, or you can keep them in storage till spring. Annuals you will want to sow in spring. Dormancy can be broken by:
- Scarification – crack or abrade hard seed coatings
- Stratification – Cold, moist conditions
- Dry heat
- Fire
- Acid, bleach, or chemicals, although chemicals are not recommended unless you know what you are doing because the possibility for damage is high.
In summary, hot and dry work together, or cold and wet work together. This article lists some common Colorado natives and their requirements for breaking dormancy:
Gardens on Spring Creek.
For the best results be sure to match the conditions of sun and water requirements for the seeds you will sow with the same ones in the environment from where the seed was collected. Do not use a rototiller, you will bring weed seeds to the surface. If you are prepping the soil, do not use more than 10% compost, our natives are very accustomed to thin poor soils and a lot of sand and gravel. The seeds need good contact with the soil, cover them 1/4 to ½ inch deep, then mulch, but very lightly.

Get permission to collect
No matter where you are collecting – unless it’s on your own property – you will also need to get permission, and that includes collecting from city, county, and state parks. You must have written permission to collect from each of those places. On Bureau of Land Management and U.S. Forest Service land, the land of many uses, we do have the right to collect, but there are some conditions involved, collect only:
-
- For personal use, not for any commercial purpose
- A small amount, and they usually mean less than 10%, ten pounds of whatever it is you’re collecting
- Plants that are common and abundant
- Plants that are not rare.
After you have your written permission, it is a good idea to walk away from the trail when you collect in a park, that way you can avoid any potential conflict with observers. Of course you cannot collect in any of our National Parks, where the firm rule is that you may not remove even a rock, let alone seeds!
Editor’s note: This information was summarized from a lively presentation Denise gave to her HOA. A good example of community outreach!
If you have questions for Denise, or if you would like to join her on a seed collection job, you can contact her at deniseclairewilson@gmail.com
Denise Wilson
Wilson Associates, Inc.
Plant Ecology
34316 Gap Road
Golden, CO 80403
Your heart is full of fertile seeds waiting
to sprout.- Morihei Ueshiba

A challenging site filled with blooms mostly
from seeds collected on Denise’s property in
Coal Creek Canyon. Photo by Denise Wilson
Resources for Seeds
Western Native Seed Company
https://www.westernnativeseed.com/
High Country Gardens
https://www.highcountrygardens.com/category/wildflower-seeds
Good “How to” videos
https://www.highcountrygardens.com/content/gardening/sustainable-backyard
Permitting from the U.S. Forest Service
https://www.fs.usda.gov/wildflowers/ethics/permit.shtml
